We take pride in crafting products that make nail care effortless for enthusiasts of all skill levels. Our SlickPour acrylic dip powder system empowers beginners to achieve stunning results from the comfort of home. And because removal should be just as easy as application, SlickPour Acrylic is designed for a hassle-free soak-off process—beauty without the struggle!

The first step in removing Acrylic dip powder nails is preparing the nail surface to absorb the solvent effectively. Start by gently pushing back the cuticles with a cuticle pusher.
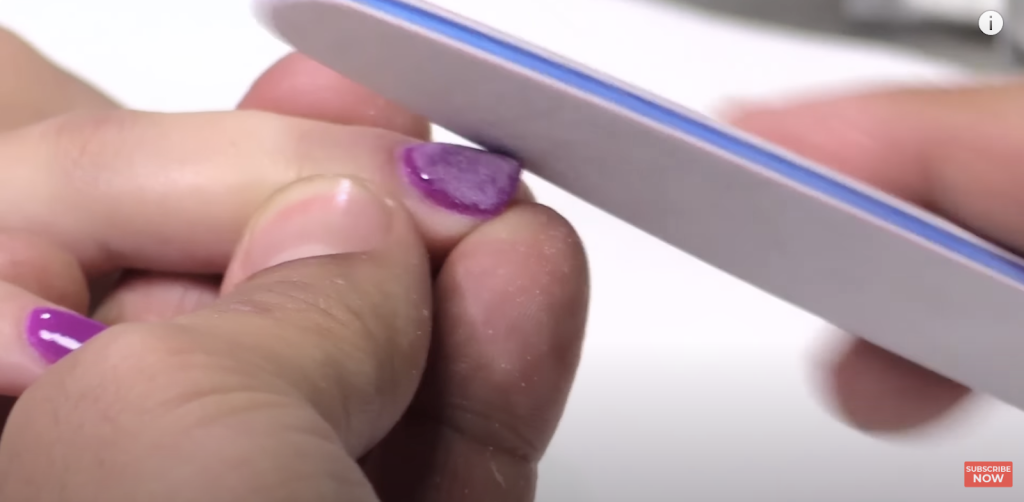
Next, use a medium-grit file or a 150 grit file to break up the nail’s surface and surrounding areas. This helps the solution penetrate the product more easily. Focus on removing the shine and breaking the seal around the edges, ensuring the acetone can dissolve the Acrylic dip enhancement for effortless removal.
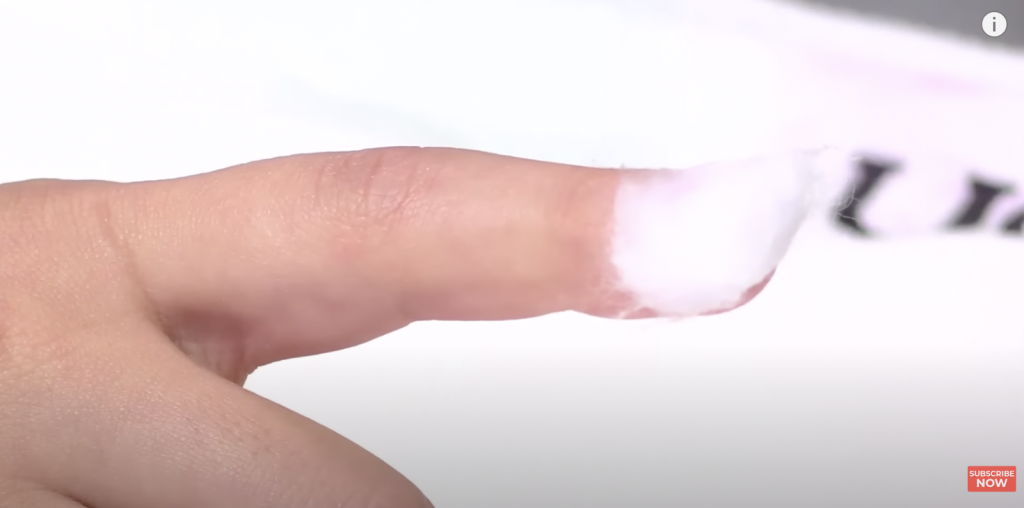
Now it’s time to soak off the dip powder. Take a small piece of a cotton ball and saturate it with acetone—you won’t need the whole cotton ball.

Place the soaked cotton on the nail surface, ensuring complete coverage, and wrap it securely with foil. Then, sit back, relax, and let the acetone work its magic for at least 10 minutes.

After 10 minutes, gently remove the foil wraps, applying light pressure. Most of the SlickPour Acrylic product should come off with the foil and cotton.

For any stubborn residue, use a lint-free wipe soaked in acetone to gently scrub away the remaining product. The soaking process will have already broken down the Acrylic dip enhancement, making this step quick and easy. Avoid pushing or forcing the product off—gentle scrubbing is all you need.
If you notice little progress when you first remove the wraps, don’t worry! The soaking process has already softened the Acrylic dip powder. Simply use a lint-free wipe with acetone, and the product will come off effortlessly.
The SlickPour Acrylic Dip Powder system is designed to protect your nails during both application and removal. Letting the acetone fully permeate the Acrylic dip powder ensures easy removal without any need for force. If necessary, repeat the cotton, foil, acetone wrap and wait another 5-10 minutes to completely dissolve the product.
The SlickPour Acrylic system is crafted for both easy application and safe removal. While applying dip nails at home might take practice, removing them is almost effortless. Feel confident that taking off your dip nails and preparing your nails for their next adventure will be quick, painless, and completely manageable.
With the recent surge of dip into the market over the last couple of years, many nail techs are wondering which service they should offer their clients: Dip Powder or Gel Polish? How does each perform? Which service would be best? Is there an easy way to incorporate these simple yet effective products into your salon business? Which one is the right one for you?
We have seen Dip Powder take the world by storm in recent years. In some instances, nail techs are ditching Gel Polish in favour this latest nail trend. Both Dip and Gel Polish are wonderful options to use directly onto the natural nail. Both are services with a very easy learning curve. So there is no intimidation factor for the beginner or expert. One might be swayed to substitute one service for the other.
A beautifully executed set of Dip Powdered nails is easily mistaken for Gel Polish. Gel Polish is the long time client favourite for its own reasons. There is magic to both. So when pressed even Tracey our YN Director of Operations has a hard time picking a favourite. Her response, “Why turn anyone or their money away?” The real profitable answer is that nail techs should offer both; if your salon environment allows.
Most salons offer Gel Polish, but a nail pro should always consider the client’s needs first. Strong nails typically handle Gel Polish well, while brittle nails benefit from the firm structure of Dip Powder. Having multiple techniques in your toolkit lets you respond to different client demands.
Mastering product control is key, especially with Gel Polish, as it prevents flooding the cuticle. To start with Dip Powder, we recommend using YN Conversion Gel with our SlickPour Dip Powder for a blend of acrylic strength and gel flexibility. While glue/resin is another option, it's less favored due to common sensitivities. Offering choices also helps reassure clients who may be anxious about UV lamps.
Here we’d like to break away from technique and talk about client relationships. The idea that nail techs should submit to their clients every whim is not in the cards. With every buzzing new nail trend, it’s important for you to stay in the know. Always educate yourself and your customer about nail health and how the trend has its pros and cons. Our recommendation is to work towards building a full clientele.
These are your “chosen ones”. You have created a relationship based on trust. These amazing clients know what you can deliver and respect your work. It’s why they keep coming back time and time again. At this point, fill your books with more of these kind of people and start weeding out the not-so-amazing clients. You know the problem ones who think they know more than a pro?
All nail pros should strive for versatility, so that there isn’t a single service you can’t do. When a new trend comes along, you are willing and excited to give it a go. When your base and fundamentals are strong, let that lead you to a comfortable expansion of services. Expand. Grow. Gain confidence. Start all over again so you find yourself being free to play around and confident to offer almost everything. You will have the right tool for every moment and cast a wide net to get every client.
Mani•Q Fibre Gel with Keratin is our revolutionary Soft Gel System, available in a bottle or pot. Contains Fibre's for even more strength. Thick viscosity lends itself to sculpting a short free edge.
Mani•Q Fibre Gel acts as it's own base and strengthener with only 2 coats required.
Step 1: Prep the natural nail as normal then use Swipe to remove any contaminants.
Step 2: Apply your first coat of Protein Bond to all 10 fingers, apply a second coat for extra security.
Step 3: Apply a thin coat of Fibre Gel, Pinky to Thumb then cure for 60 secs. Continue with other hand while curing.
Step 4: Apply a second coat of Fibre Gel then cure for another 60 secs
Step 5: Wipe the dispersion layer from the surface and apply your Cuticle Oil.
Once you've applied 2 coats of Fibre Gel and cured, DON'T wipe the dispersion layer, apply your Gel Polish to the sticky layer then cure and top coat as normal.
If the nails require shaping, remove the dispersion layer with Swipe, shape the nail as you like, remove any dust using Swipe again. Apply Protein Bond (no need for base coat) then your Gel Polish.
Step 1: Prep the Natural Nail as normal then use Swipe to remove any contaminates.
Step 2: Apply your first coat of Protein Bond to all 10 fingers, apply a second coat for extra security.
Step 3: Create a base layer with Fibre Gel, apply a thin layer, Pinky to Thumb then cure for 60 secs. Continue with other hand while curing.
Step 4: Once cured, place a Form on your clients finger.
Step 5: Using Fibre Gel in a Pot or Bottle, Apply to the Form until fully connected.
Step 6: Add more product if need and shape while wet. Cure 1/2 fingers at a time to keep self levelling properties.
Step 7: Freeze Cure for at least 30 sec. Then remove the form using a Magic Wand. (Keep dispersion layer)
Step 8: Snip away any dangly bits.
Step 9: Apply an even foundation layer to the rest of the nail for structure then cure.
Step 10: Once fully cured, use Swipe to remove the tacky layer.
Step 11: File n Shape ( perimeter shaping first before reducing bulk)
Step 12: Remove dust with Swipe, apply Protein Bond then Ultimate finish Gel.
Step 1: Prep the Natural Nail as normal and use Swipe to remove any contaminates .
Step 2: Apply your first coat of Protein Bond to all 10 fingers, apply a second coat for extra security.
Step 3: Apply a thin coat of Fibre Gel, Pinky to Thumb then cure for 60 secs. Continue with other hand while curing.
Step 4: prep your full cover tips using our E-File Pen.
Step 5: Apply a thin coat to the inside of the Tip, press gently onto the natural nail freeze cure using our handy lamp.
Step 6: Do this to all 10 Nails.
Step 1: Remove any bulk to make sure existing product is totally flush with the natural nails using an E-file
Step 2: Prep the natural nail as normal and then use Swipe
Step 3: Apply your first coat of Protein Bond to all 10 fingers, apply a second coat for extra security.
Step 4: Pillow the Fibre Gel into the growth area and pull forward to blend with existing product. Cure for 60 seconds.
Step 5: Re-balance the structure to compensate for growth
Step 6: Wipe the dispersion layer from the surface and apply your cuticle oil.
When removing Fibre Gel we recommend using an E-File rather than soaking off. Fibre Gel is a soft gel so it can be soaked off if needed.

All my clients were pro Acrylic until Fibre Gel was introduced... Since then ALL my clients now have Fibre Gel instead of Acrylic, I can do 2 Fibre Gel sets in the time it takes me to do 1 acrylic set!
Transitioning from Acrylic to Gel Polish just wasn't an option for me as my clients needed strength. Once I had hold of Fibre Gel , it was the perfect opportunity to do this. Fibre Gel is more than strong enough to satisfy my clients. If an extension/repair is needed I tend to use the Pot as I have slight more control.
Check out our Youtube
With Monika Then, YN Mentor, Young Nails UK
Instagram @monikathen_yn_mentor
To be yourself in a world that is constantly trying to make you something else is the greatest accomplishment. – Ralph Waldo Emerson
It’s quite common to break into terrified cold sweats when it comes to putting yourself out there in a bid for self-promotion and marketing. If you’re scared of posting on social media, we’re sharing our biggest secret to getting over the hurdle. We had the chance to sit down with YN UK Mentor, Monika Then, who over the course of one year transformed her relationship with social media, herself and her business for the better. Monika took the plunge and forced herself to step outside her comfort zone, every day for 365 days. The risk was relatively minor compared to the reward; especially when it comes to making a livelihood. The results were incredible, today she’s grabbed the attention of 40K followers. See for yourself how she gets the job done, follow her work on Instagram @monikathen_yn_mentor.
Monika: The first video I posted, I spent about 5 hours on it. Even after spending all that time, I still thought it wasn’t good enough. It takes time to shoot, edit, add music, cut something, speed things up. Everything was new for me. Back then, it was possible that my daughter could have posted faster (than me.) Now I can do it in a few minutes.
If you set your mind to do something, it can be achieved as long as give yourself a consistently safe space for trial and error. There might be an inner critic telling you that you’re not good enough or that everything has to be perfect in order to post. In reality, perfection is a stalling tactic for the risk-averse. Quiet that inner critic by being kind to yourself and be authentic throughout your learning process. There is no shame in being imperfect. The goal is to share something about you/your work every day. We never said it had to be perfect.
Monika: I took the suggestion, “You have to do more video” and just started posting content. I thought, I have just to go home and start doing this now. I just posted it and it worked. In the beginning, on Instagram, I was like just today or maybe 2-3 times a week. I look at social media as a part of my work now. It is something that you have to do all the time.The first year I started with zero. I just used my phone. I learned by testing out a few apps. I studied YouTube to see if I could do similar things. In year two, I grew from a few to 2000 followers. Today, 1,954 posts and three years later, I hit 40K followers.
Proceed slowly and one day at a time. Believe in yourself. With a tad more effort than you use to post your #staycation, you will be well on your way to posting more content. You already have everything you need. It doesn’t have to be crazy or complicated. Prioritise posting daily for a week, try a mini 7 Day Challenge. Break through the feelings of impossible to discover it is possible. Ask a fellow nail artist or salon mate to join you on the journey of building this new marketing habit. Notice what works for you and what doesn’t. After you clear one week, see if you can continue the week after, and so on and so on. The more you do it, we promise the easier it will become. Accept that some days are going to be more challenging than others. That’s just the nature of things.
Monika: I plan around, Who is coming today? Who is my client? The post doesn’t have to be huge or creative. I ask what knowledge or information can I offer even if it’s simple or basic. Just putting out good simple information helps a lot. It doesn’t have to be three inch stilettos with marbling and sculpted 3D flowers. Salon work is different than that. Students want to learn how to do nails. The simple (boring stuff) is important like hygiene and finish plus all the steps in between. I base (everything) on the nails that I’m doing that day. I put the camera on and don’t overthink it. Some posts just don’t do well. And that’s just it. No big deal. Get yourself organised. Think when you can do it. Get your phone. Hit record. Download the app to help you present it how and when you want to.
Big reveal...content is what you are already doing. I’m going to shoot and document it instead of create it. That’s how you get a lot of videos. Boom. That’s the true secret to creating daily content. Don’t overthink it. We recommend putting out small bites of education or entertainment. What makes content engaging is how it’s digested. Hook your audience with a straight forward video about removing shine, pushing back cuticles, working around the cuticles or building the body. These are all vital to what makes a set of nails hold up. You don’t have to create separate stand alone pieces of content. Keep it simple and document the salon starring you being you. You already have what it takes.
Monika: I’ve done videos that I’ve criticise, of course. Some weren’t centered, the background wasn’t great or the brush was on the side and I didn’t like it. I still posted them anyway. I actually never had a bad experience with it. Nothing bad actually happened to me when I posted something that I didn’t like. It didn’t matter in the end result. I’ve had people criticise or comment in a negative way. Even though I was afraid in the beginning, it still has never put me off from posting. There are posts that I didn’t like but got 100K+ views..
Just start to experiment and put it out there. The quality of the work improves as you go. The next time will be better. Sometimes the obvious is not so obvious while you are working in the moment. You learn from your mistakes. You can’t take the negativity you might receive personally. For every one critic, there are many more supporters of your work. Focus on the positive. That being said, don’t discount the criticism. Sometimes we are too close to the work to be objective. See if there is actually some feedback you can take from it. Turn over the criticism and examine it with curiosity. If it doesn’t serve you in any way; do not let it take up residence in your head space. Let it go.
Nobody likes double dipping. Young Nails Slickpour Acrylic Dip Powder is the easiest powder coating system. The Air Dry application and removal process is a breakthrough in nail enhancement technology. With a service that's clean and fast; you'll go crazy over the mighty staying power and glossy powder coat finish of each set.
Step 1: Prep the Natural Nail with a hand file or sanding band. Dust off and dehydrate nail with Swipe and apply Step 1 (Prep). Do not use Protein Bond for this step.
Step 2: Allow your Prep to dry (1 min). Then apply Step 2 (Base) follow with pouring your Slickpour Acrylic Dip Powder over your wet Base on all nails.
Step 3: Dust off excess and apply another layer of Base followed with pouring your Slickpour colour on. Tap off any excess.
Repeat Step 3 one more time with your colour or cap it with clear slickpour powder.
Step 4: Apply a layer of Activator (Step 3) and allow to set (two minutes).
Step 5: Once Slickpour is set file and shape if required, and buff on top
Step 6: Dust of excess and Swipe.
Step 7: Apply another coat of Activator and with clean pad rub into nails.
step 8: Quickly apply Slickpour Top (Step 4) on all nails. Important !! Wipe your top coat brush on clean pad after every nail before dipping back to bottle.
Step 9: Apply second coat of Slickpour Top to all nails again make sure you wipe your brush before dipping into the bottle.
Step 10: Depending on room temperature and clients nails drying time is between 3-5 min. Important !!! Do not touch nails in meantime!
Step 11: Apply Cuticle oil
Step 1: Prep the Natural Nail with a hand file or sanding band. Dust off and dehydrate nail with Swipe. Then 2 coats of Protein Bond.
Step 2: Apply Conversion Base and cure for 30 sec.
Step 3: Apply Conversion Base (don't cure) and pour over your Slickpour colour and cure for 30-60 sec.
Step 4: Repeat Step 3
Step 5: Swipe nails to take tacky layer off and file and shape.
Step 6: Dust off and Swipe nails, apply Protein Bond.
Step 7: Apply Conversion Top and cure for 30-60 sec.
Step 8: Apply cuticle oil.
You can also use our Slickpour System like you would with normal acrylic, Wet your brush with monomer and pick up a nice fluffy bead :).
We take pride in creating products that make nail care accessible for enthusiasts of all skill levels. Our Slickpour Acrylic Dip Powder allows beginner nail lovers to achieve beautiful results in the comfort of their homes. Removing dip nails at home should be just as simple as applying them, which is why we love the SlickPour system—it’s as easy to remove as it is to apply.
The SlickPour system is crafted for both easy application and safe removal. While applying dip nails at home might take practice, removing them is almost effortless. Feel confident that taking off your dip nails and preparing your nails for their next adventure will be quick, painless, and completely manageable.
Our Slickpour Starter Kit contains:
- Clean & easy application
- Calcium & Vitamin E fortified
- Strong & Durable
- Easy removal
Kit Includes:
1/2 oz Prep Step 1
1/2 oz Base Step 2
1/2 oz Activator Step 3
1/2 oz Top Step 4
5 - Brush Refills
Double Sided Pouring Spoon
2 - Glass Dampen Dishes
6 - Catch all Cups
15g Newbie Pink

“MIGHTY THINGS FROM SMALL BEGINNINGS GROW.” — JOHN DRYDEN.
In the early stages of your nail profession, there is a multitude of tempting products and tools to stuff in your salon kit. Who hasn’t wanted to redirect funds from a boring yet wise purchase for something racier like a seasonal limited edition Swarovski crystal mix? What is the nail techs equivalent to an essential capsule collection or a new driver’s starter car?
You want to binge-buy everything that catches your eye. You want it now. Nom nom nom, feed the ravenous glitter monster within. Red flag warning! Please slow down and be purposeful. Don’t spend what you don’t have. Square one is to create a spending plan that allows you to operate a steady nail business. Do you know which services you'll offer? What's your budget? Can you plan how many sets you can do with your current products? Remember to schedule regular product restocks. Keep track of what you use and spend. Start with a simple shopping list, track your expenses for three months, and see how much you spend each month.
To spend wisely, the bulk of your initial salon buy will consist of Core products. Decide if you’re going to offer Acrylic or Gel. It’s best to call out now what you want to be known for…basically what will be your number one service? Then pick up the essentials for that system. Our Saver Bundles are an affordable way to do this, save yourself 20% on every saver, this will maximise profits! You will absolutely need a good UV lamp (or two). You will also need to start with an E-file to save your wrists from the wear and tear of hand filing. Both are big ticket items but worth every penny. The basics are what you use to build a business. The core products for your starting line up should be a set of 12 colours that include best selling classics like nudes, reds, pinks, and a couple trendy colours. You can layer on to that another 12 Glitters. Custom glitter mixes provide endless possibilities. Lastly you will need a couple of high-quality brushes. Don’t over extend and dig yourself into any unnecessary debt before you bring in your first customer.
For some reason, many nail techs can’t wrap their head around “less is more” philosophy. Take baby steps. A variety of specialty products means nothing if you still haven’t found your first client. Train yourself to slay in one specific service. Let that be your thing, your expertise. You will never regret it. As you build up your cash reserves, now you can pull in something new for fun. You can even plan when you will reward yourself with a splurge purchase. YN Pro Kits in acrylic or gel offer the most bang for your buck at a £300 starting investment. Just throw in a light and you’re ready to book clients. When in doubt turn to your nail community and ask for support. You may be going solo for the first time but you never have to do anything alone!