
There is nothing worse than the sudden heartbreak of a split nail or a broken enhancement. Fortunately, you don’t need to file it all the way down or panic. If you are wondering how to fix a cracked nail, the secret lies in a quick, professional repair. In this step-by-step guide, we’ll walk you through how to flawlessly repair both cracked natural nails and damaged full cover tips, using the new Young Nails Rescue Patches—ensuring your manicure looks as good as new in minutes.
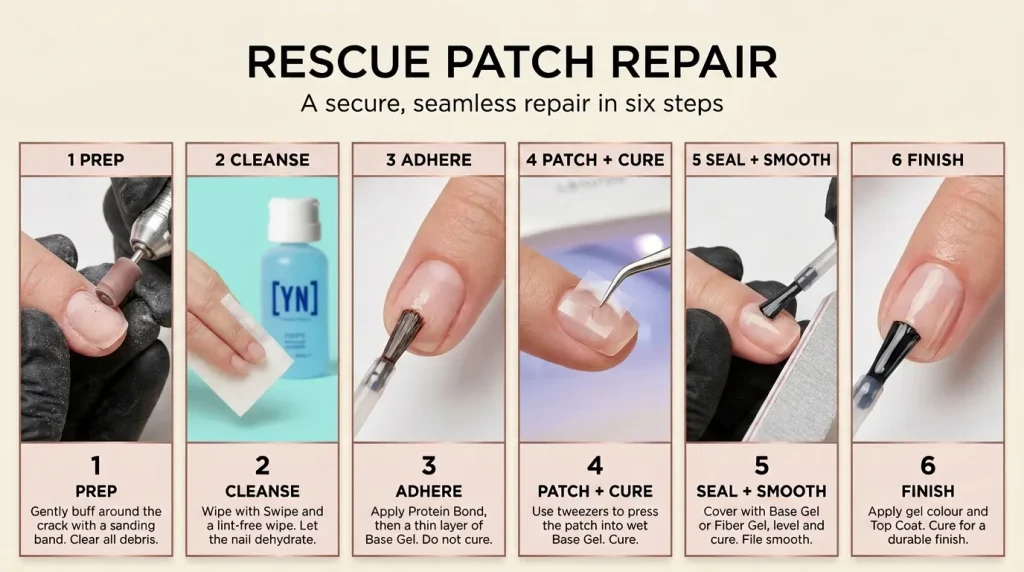
As shown in the image above, a professional nail repair seamlessly mends cracks while reinforcing the nail's structure. The key to a successful repair lies in prepping the damaged nail for a smooth, long-lasting finish, which involves properly cleaning around the crack and securing the area to prevent lifting. Here's a breakdown of the essential steps and products used in this process:
Before fixing a cracked nail, safety comes first. It is crucial to gently clean and prep the damaged area to prevent infection, avoid further breakage, and ensure your nail repair lasts.
Using a base gel helps adhere the rescue patch firmly to the nail, ensuring that the repair stays put without lifting at the edges.
Nail Rescue Patches (Young Nails) are essential for bridging the crack and providing a smooth base for further repair steps.
It's important to know when to use a base coat for simple repairs and a clear fibre gel for enhanced durability and strength.
Achieving a smooth, invisible repair requires careful sealing and finishing. This involves applying a gel top coat over the repair to seal it off from moisture and contaminants.
Applying gel polish and top coat not only adds a splash of colour but also further seals and protects the repaired area.
The repair process consists of several precise steps to ensure the best results:

Successfully repairing a cracked natural nail or broken gel extension is not just about aesthetic restoration; it's about maintaining the health and integrity of your nails. The main difference between repairing a natural nail and a gel extension lies in the approach to prepping and the type of reinforcement used, such as the necessity of a fibre gel for additional strength in gel extensions. If you've found this guide useful or have any further questions about nail repair, feel free to comment below or subscribe to our channel for more professional nail education. Engaging in regular nail maintenance and repair can significantly extend the life of your manicure and keep your nails looking pristine.
